


Today i would be putting you through the process of implementing twitter social login in your nodejs/express applications.
Twitter uses the standard OAuth for authenticating users and applications on their platform.
What is OAuth?
OAuth is an open standard that specifies the authorization protocol that describes how unrelated services can safely allow authenticated access to their data without sharing the initial, related, single logon credential. This is also known as third party sign on. You can visit this blog to read more about OAUth . For the sake of this tutorial we would be concentrating more on nodejs and express .
Before you get started
This tutorial assumes that you have a basic knowledge of nodejs and how it works, and active twitter developers account, and you have nodejs and the node package manager installed on your system.
visit this link to apply for a twitter developers account if you don't already have one.
After successful approval of your developers account head over to your developers dashboard under settings edit the app permissions to include read and write ,also you will be able to access your consumer key and consumer secret key in the keys and tokens column on the dashboard.
You can also download Nodejs from the official site here .
Required packages.
node-twitter-api (npm documentation here).
ExpressJs documentation
Express-sessions npm
dotenv npm
A brief explanation of how the twitter OAuth process works
The twitter oauth process can be broken down into three stages
- Obtaining a request token - this process requires you sending a post request to the twitter api
endpoint with your approved consumer key,consumer secret and calbback url as headers (this will be handled for us by the node-twitter-api package).After a successful request, a link will be returned containing the request token and request token secret.
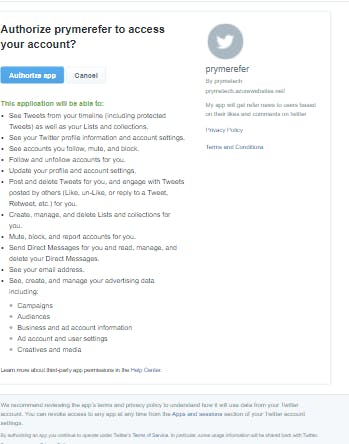
- Redirecting the user to the returned link - After a successful request from phase 1 above, the user will be redirected to the link that was returned from phase 1.The link takes the user to the twitter authorize page where the permission your app is seeking will be displayed for the you to authorize.
3.After successful Authorization the user will be redirected back to your app using the callback URL you specified earlier .Here you will convert the request token to access tokens that can be used to fetch the users information from twitter.
Get Started
First we need to create a working directory and install our dependencies there in. open a command prompt on your desktop and enter the command
mkdir twitterOauththis will create a folder name twitteroauth on your desktop
Next navigate into the folder using the following command
cd twitterOauthThis should move the context of your command prompt to the folder you just created .
Next initialize npm using the command below.
npm init -yThis will create our package.json file containing information about your app
Next we would install express and other packages needed to run our application using the command below.
npm install express node-twitter-api ejs dotenv express-session
After sucessfull installation of the packages create a file in the root directory of your project and name it .env (here you will store all your environment variables as below).
TWITTER_CONSUMER_KEY = 'your twitter consumer key'
TWITTER_CONSUMER_SECRET= 'your twitter consumer secret'
TWITTER_CALL_BACK_URL ='your registered twitter callback url'
After setting up your env file create a file in your root directory and name it index.js, this will be the main file in your application. Inside of this file import your needed dependencies and configure the application middleware's as follows
const express = require('express');
const path = require('path');
const dotEnv = require('dotenv');
const twitterApi = require('node-twitter-api');
const session = require('express-session')
//pull twitter credentials from env file
const { TWITTER_CONSUMER_KEY, TWITTER_CONSUMER_SECRET, TWITTER_CALL_BACK_URL } = process.env

const app = express()
// set the path to serve static files
app.set('views', path.join(__dirname, 'views'));
// view engine setup
app.set('view engine', 'ejs');
//set session
app.use(session({ secret: 'keyboard cat', cookie: { maxAge: 60000 }, resave: false, saveUninitialized: true }))
//set listening port for our application;
const port = 4000;
app.listen(port,()=>{cosole.log(`app listening on port ${port}`)})
Next you need to initialize the node-twitter-api package in our index.js using your twitter credentials.
const twitter = new twitterApi({
consumerKey: TWITTER_CONSUMER_KEY,
consumerSecret: TWITTER_CONSUMER_SECRET,
callback: TWITTER_CALL_BACK_URL})
Explanation: The above code creates an instance of the node-twitter-api package using your twitter credentials.
After initializing the node-twitter-package next we would configure our routes to listen to and process requests accordingly.
//route to get request tokens and redirect user to twitter authorization page
app.get(
'/twitter',async(req, res) => {
       //get authorization url using instance of node-twitter-api
   let oAuthUrl = await twitter.getRequestToken((error, requestToken, requestTokenSecret, results) => {
            if (error) {
                return ({error:error});
            } else {
                    // set authorization url
                let url = `https://twitter.com/oauth/authorize?oauth_token=${requestToken}`;
                return (url);
            }
        })
    res.redirect(oAuthUrl )
})
Explanation: The above code receives a request on the '/twitter' route and then uses an instance of the node-twitter-api package to get the request token and the request token secret from twitter and then redirects the user to the url returned by the node-twitter-api package.
Next you would configure the route for your twiter callback url( note that this route will need to match with the callback url registered on our app dashboard and also match with the one used to initialize the node-twitter-api).
app.get('/twittercallback',async(req, res) => {
       //get user acess tokens using node-twitter-api
   let tokens = await twitter.getAccessToken(req.query.oauth_token, req.query.oauth_verifier, (error,accessToken, accessTokenSecret,results) => {
            if (error) {
                return ({error:error});
            } else {
                return ({accessToken:accessToken,accessTokenSecret:accessTokenSecret});
            }
        })
    if(!tokens.error){
        let userDetails  = await twitter.verifyCredentials(token.accessToken, tokens.accessTokenSecret,{ include_email: true, skip_status: true },async (error, data, response) => {
            if (error) {
                return ({error:error});
            } else {
                    // process and return user data
                return ({user:data});
            }
        })
        //redirect user to dashboard view or any other view of your choice.
        return res.redirect('/dashboard',{user:userDetails});
       }
})
Explanation: The above code configures the route for your callback url The route will receive a get request from twitter, then get the authorized request token and request token secret from the query parameters .It uses this two parameters to request for the user access tokens (using the instance of the node-twitter-api pacakge ) .After successfully getting the access tokens ,the acess tokens are then used to request for the users profile information. After getting the user information you can process as you see fit.
Complete code.
const express = require('express');
const path = require('path');
const dotEnv = require('dotenv');
const twitterApi = require('node-twitter-api');
const session = require('express-session')
//pull twitter credentials from env file
const { TWITTER_CONSUMER_KEY, TWITTER_CONSUMER_SECRET, TWITTER_CALL_BACK_URL } = process.env

const app = express()
// set the path to serve static files
app.set('views', path.join(__dirname, 'views'));
// view engine setup
app.set('view engine', 'ejs');
//set session
app.use(session({ secret: 'keyboard cat', cookie: { maxAge: 60000 }, resave: false, saveUninitialized: true }))
//set listening port for our application;
const port = 4000;
app.listen(port,()=>{cosole.log(`app listening on port ${port}`)})
//initialize instance of node-twitter-api
const twitter = new twitterApi({
consumerKey: TWITTER_CONSUMER_KEY,
consumerSecret: TWITTER_CONSUMER_SECRET,
callback: TWITTER_CALL_BACK_URL})
//route to request request tokens and redirect user to twitter authorization page
app.get(
'/twitter',async(req, res) => {
       //get authorization url using instance of node-twitter-api
   let oAuthUrl = await twitter.getRequestToken((error, requestToken, requestTokenSecret, results) => {
            if (error) {
                return ({error:error});
            } else {
                    // set authorization url
                let url = `https://twitter.com/oauth/authorize?oauth_token=${requestToken}`;
                return (url);
            }
        })
    res.redirect(oAuthUrl )
})

app.get('/twittercallback',async(req, res) => {
       //get user acess tokens using node-twitter-api
   let tokens = await twitter.getAccessToken(req.query.oauth_token, req.query.oauth_verifier, (error,accessToken, accessTokenSecret,results) => {
            if (error) {
                return ({error:error});
            } else {
                return ({accessToken:accessToken,accessTokenSecret:accessTokenSecret});
            }
        })
    if(!tokens.error){
        let userDetails  = await twitter.verifyCredentials(token.accessToken, tokens.accessTokenSecret,{ include_email: true, skip_status: true },async (error, data, response) => {
            if (error) {
                return ({error:error});
            } else {
                    // process and return user data
                return ({user:data});
            }
        })
        //redirect user to dashboard view or any other view of your choice.
        return res.redirect('/dashboard',{user:userDetails});
       }
})
//set listening port for our application;
const port = 4000;
app.listen(port,()=>{console.log(`app listening on port ${port}`)})
Please note that this code is in no way production ready , a detailed implementation of this process can be found in this github Repository.
You can contact me on twitter for futher questions and clarifications
Dont forget to leave comments below thanks.